The Hyperpessimist

The grandest failure.

The PASM Progression

If you’ve been to some photography communities on the internet and are about to learn to do “serious” photography, that is photographing while being aware of your camera settings, you get a lot of advice thrown at you. Certainly it is often helpful and posted with the best intentions but I often wonder about people suggesting to “go manual” right from the start.

These more “professional” modes are often called PASM (Program, Aperture, Shutter, Manual), as they are labeled as such on cameras like Nikon DSLRs, in case you’re wondering what the title of this post means.

Going manual

What this means is that you switch to the “M” mode on your DSLR/mirrorless camera in which case you will have to take care about aperture, speed and possibly ISO as well (depending on how “manual” you want to go).

Maybe it is just me being completely talentless, but I think it is rather difficult to start off this way. Sure you will learn a lot, but will you miss a lot of shots? Most likely. I found this approach to be rather demotivating because you have a camera that now takes pictures which look worse than what your all-auto smartphone produces. Either they are very dark because you’ve underexposed, very bright because you’ve overexposed or very blurry because your shutter speed was too low until you finally get the hang of it.

A modest proposal

Maybe it helps you to get a feel for the modes and the factors that make up your photograph by just slowly approaching it. For me it was always most useful to learn about things when I could apply them directly. So for starters, set your camera to “P”-mode. It’s a mostly automatic mode, so it handles aperture, shutter and ISO for you, but (at least on the Nikon DSLRs) it unlocks all kinds of additional tools like being able to select the metering mode, setting exposure compensation (making pictures darker or brighter) etc. It’s great if you like the automatic mode but then want a bit more control. Like when the automatic mode failed and you want to give it a bit of a hand.

The next mode, Aperture Priority (called A or Av) is often useful when you want to control the depth of field. With the lenses that cameras often come with, this setting makes less of a difference but if you buy one of the affordable f/1.8 prime lenses you can easily get images where just the subject of the image is in focus and the background nicely blurs away. For controlling this you use the A setting, set it to smaller values to have less in focus or larger values to have more in focus. This is basically the bread-and-butter mode since it is (within some reason) the only setting that affects the artistic contents of your image. The other settings mostly deal with more technical settings. No shame in using it all the time, many photographers do. In the beginning you’ll most likely overdo the “blurry background”, don’t worry about it.

Then there is the Shutter Priority mode (S or Tv), specifies the exposure time of the frame. For example, if you want to freeze motion, you need to have a very short exposure time, but when you want to deliberately blur something, then a larger shutter time is a good choice. Why is this mode necessary? Because the camera can’t figure out what you want to photograph, so whether you want it to be frozen in time or with motion blur like it moves very fast. Depending on what you photograph you might rarely if ever need this or you might need it all the time.

Both of these modes can be further influenced with the Exposure Compensation setting: it basically means that you have the “main” setting (whether it is aperture or exposure time) fixed at the value you selected but then it influences the other setting that the camera is taking care of by some amount (thereas positive compensation means lighter picture and negative means darker picture). This is a very useful option, since the camera is often doing the right thing already, it just needs a small adjustment in one or the other direction.

Finally, the holy grail, full manual (M) mode. Actually there is nothing special about it. Here you control both the aperture as well as the exposure time. You control both settings directly, there is no automatic selection except for maybe the ISO. There is nothing inherently magical or mythical about manual mode. Like the other modes, it is useful sometimes and less useful other times.

Manual is often useful when you want to have a series of photos which match each other without the camera suddenly deciding to pick some different settings. It is also useful if you are working with studio lights or flashes. Or if you take long exposures. Usually you set your ISO to 100 in such cases.

The question is: is your case one of these? Can’t you get away with worrying less about the settings by picking one and let the camera take care about the other two? It does not save you any time to have to take the same picture twice because your first was incorrectly exposed.

Going manual, once again

So after imploring you not to believe you’re not a “real photographer” if you don’t use manual mode, it sometimes is still useful to use it. There are cases where you want to push your camera to have a great depth of field but also a fast shutter length. In such rare cases I like to set the camera to manual mode but let it decide the ISO on its own. This way I can go from dark scenes to bright ones, without having to worry that the exposure will be messed up.

This is my proposal on how to use the camera modes. This is how I work with my camera, for the most part.
Strangeloop 2016 Recommendations

If you have followed me on Twitter and opened your timeline recently you probably couldn’t miss the fact that I was on the Strangeloop conference. I will admit that this was the best conference I have visited: the talks were inspiring, the location was fantastic and the food was excellent as well. I’ve even grown to like St. Louis for it’s beginning of the centaury highrise buildings downtown.

So in this blog post I want to present you the talks I liked most, along with links to the videos in case I managed to convince you to secrifice time of your life to head my recommendations.

Why you can trust me

I have been to a number of conferences and even given some average talks, so I know what I am talking about. Also I have a blog, so I must know what I’m thinking about.

The selection

The order is undefined, because I wouldn’t say that one talk is better than another. I liked them all but often for very different reasons.

  • Humanities x Technology” was one of the keynotes and it was incredibly inspiring. Exploring into why empathy is important, even for programmers.
  • An Introduction to Combinator Compilers and Graph Reduction Machines” is an introduction to how functional programming languages used to be compiled. It focusses on the SKI combinators which were interesting to me since I heard about them before but didn’t understand what they were used for.
  • GraphQL: Designing a Data Language” introduces GraphQL. Skip if you already know about GraphQL, but I learned some new things from it and would want to give it a try sometime in the near future.
  • African Polyphony & Polyrhythm” on how african music is structured. I have no idea about music, but I still enjoyed the talk and learned something.
  • Fold, paper, scissors - an exploration of origami’s fold and cut problem” is a very cool talk taking an obscure topic and applying CS methods to it. I have become quite jaded with CS, solving always the same things ad nauseam, but this talk has reminded me of the magic of problem solving that I felt when I first saw Bresenham’s algorithm.
  • Languages for 3D Industrial Knitting” is on how knitting works and how knitting machines can be programmed. The talk was both informative and very funny. I’m glad that people still do cool, weird (strange?) stuff.

I’m sure there were other good talks, this is just the subset I attended and would recommend to watch at home if you haven’t.

A cool thing to note is the fact that these videos are already online, it took the organizers about a day to upload and publish the talks. Very impressive.

D800 Impressions

I’ve been using the Nikon D5100 for a number of years and still think it is a phantastic choice, but lately have been thinking of buying a “nicer” camera. There is a number of pain points I have with the D5100:

  • The camera is just very small, my pinky has nowhere to go
  • Some options like Auto-ISO are pointlessly hidden in menu layers
  • The low-light performance could be better
  • Weather-sealing, anyone?

Admittedly, these are very minor points and I can still comfortably use it, so I’ve been in no hurry to upgrade. Yet when a friend of mine went on vacation, I asked whether I can play with his camera during these three weeks to figure out for myself whether I want something like this. My friend shoots in a very different fashion compared to what I do, so what works for him might not work for me and vice versa.

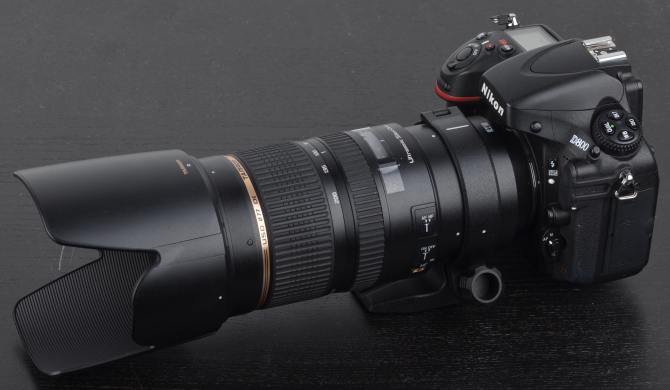
Here it is, a Nikon D800. Added a Tamron 70-200mm f/2.8 for scale and for you to judge how large or tiny my dick is.

Likes

I liked quite a few things:

  • It feels great in hand. Yes, it is large, but switching between this monster and the D5100 the latter feels completely like a toy
  • It’s heavy. Most people I’ve handed it to considered it too heavy, but after putting it on a scale in a discount super market (2600g including the 70-200), I consider it a feature because it balances nicely. But you do need a decent strap.
  • The viewfinder is fantastic. As in: amazingly good. I can see things in the viewfinder. It’s much larger and brighter and a lot more comfortable. Hard to say whether the feel in hand or the large viewfinder are my favorite features.
  • Despite being an early model on which the auto-focus is said to be wonky, it worked fine for me. The 51 AF spots were nice, though very much in the center of the frame. The 3D tracking, once I figured out how it works was quite impressive. Even with 3rd party lenses, the focussing was surprisingly quick.
  • It has more options than you can shake a stick at. Pretty much everything is customizable. There’s so many option buttons which I didn’t end up using since there was already a button for everything and the kitchen sink.
  • In particular, the Auto/Manual ISO function can be switched easily using the buttons and wheels. Unlike the D5100 which hides said option deeply inside its settings.
  • It has weather sealing and is built to last. I don’t tend to baby my electronics so some extra robustness is very much welcome.
  • The pop-up flash feels nice and solid. Never used it but its mechanics give it a much more high-end feel than the cheap pop-up on my small DSLR.

Nolikies

Not everything is gold and rainbows with the D800.

  • The camera shoots slowly. 4 frames per second is the same speed as with my entry-level D5100. Of course it shoots with 36 megapixels, not 18, but I would rather have less megapixels and a faster frame rate. Canons 70D shoots 7 fps which is roughly the speed I would like to have. No need for immense frame rates like the 7D, D500, 1DX or D5. But 4 is a tad low.
  • The files are massive. 15 MB JPEG plus some 45 MB RAW. This also takes forever to write to card. I could switch to lower res, but that would probably lead to regrets of taking the perfect picture but in potato quality. Also, it wouldn’t make the camera any faster.
  • CompactFlash slot. I’d rather have a fast SD slot or a XQD slot. The CF/SD mix is unpractical or expensive or obsoleted while not being massively fast.
  • The white balance is wonky. Maybe that’s the fault of my Tamron lens, but sometimes the JPEGs came out in a weird way, mostly too red-ish. Attempting to switch to different modes did not help much. Can be fixed in post, but still annoying.
  • The multi-direction button in the back is in a bad spot because my nose keeps pressing the left direction pad, making the AF point wander to the left. Took me a few days to understand why the point was moving to the left all the time. Even considered that the AF might be broken. But no, it was my nose. Alternatively, it’s a problem with my nose and I should get another one.
  • The “pro” button layout is not as good as expected: it has four options (ISO, bracketing, white balance and quality), two of which are rarely used (bracketing and quality) and one (white balance) should not need as much use, since on the D5100 I almost never need to touch it so I don’t know why the D800 is such a massive step back.
  • Since the 4 button thing occupies the spot where the mode wheel is on “consumer” bodies, the mode is set using a switch on the other side which is in an awful position and hard to reach.
  • The shutter sounds like mashing the lid of a dumpster, it’s that loud. I suppose I can’t use it at night since the neighbors might be calling the police.
  • No infrared receiver? Come on Nikon, you cheaped out on a 50ct part? Even my D5100 has two (2!) of them, very useful for triggering it on a tripod. The remotes are cheap and reliable (heck, even my phone has infrared) so I have zero understanding why I would need to add an ugly external one
  • There is no distinction between AF points when in portrait and landscape orientation. Saw this ingenious feature on the Canon 70D and loved it right away.

Conclusions

I wrote down many more complaints than praise, which probably does not do the camera justice, but for a device I would need to pay roughly 1000€ (used, at the time of writing) I want to nail it. And the D800 is by no means a bad camera, but after three weeks of testing I am confident to say that it’s not going to be my next camera. Generally, I very much enjoyed having the camera over for longer as it allowed me to get to know it much better and test it in various occasions. I consider D800 a great camera for studio work (which incidentally is exactly like it is used in its day-job) where a high resolution is desired and the light is well controlled.

What are my options? For now I will be staying with the D5100 since apart from the few complaints above it still delivers awesome images and in certain regards tops the D800. But the nagging voice still remains, so the next camera I’d love to test is the D750 which seems to be a perfect match spec-wise.

Building a Recording Stand Howto

I recently wanted to start recording sound in a maybe not professional but at least somewhat decent way that does not sound horrible. That of course requires a microphone. Unfortunately decent microphones can run quite expensive (just like apparently every single one of my hobbies) so I decided to check for recommendations.

Microphones usually come in either USB or (better) XLR versions so you can either plug them into a computer directly or connect them to a sound board and then connect that to a computer. While I am sure this would provide by far the best sound I looked around for more universal and cheaper alternatives which do not involve buying half a music store.

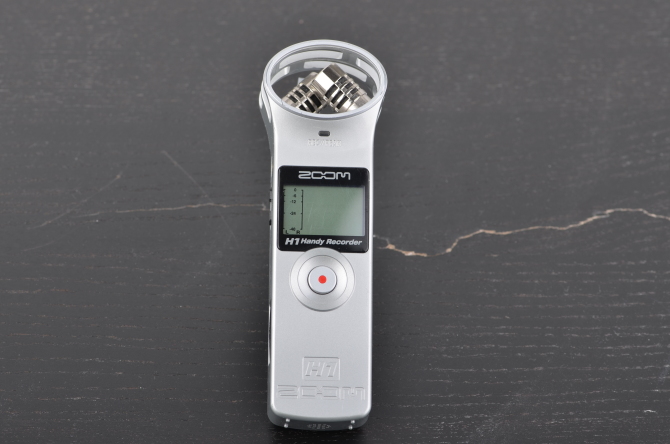
One of the most common recommendations was the Zoom H1 which is not only a microphone but also a recorder and is kinda like a dictation machine. It can record from its built-in microphones or record from any other 3.5mm jack audio source. Recordings go to its internal microSD card or it can even be used as a USB microphone starting with the 2.0 firmware. Pricewise the H1 runs for roughly 100€ new (that’s roughly 100 american for you).

Since I am a cheapass I got it off eBay for roughly 65€ which also explains why it is in this silver colour. Oh and by the way if you click the images you’ll see them in ridiculous (original) size. Yes my table is broken but you can try to pretend it’s lightning striking the devices in a dramatic manner.

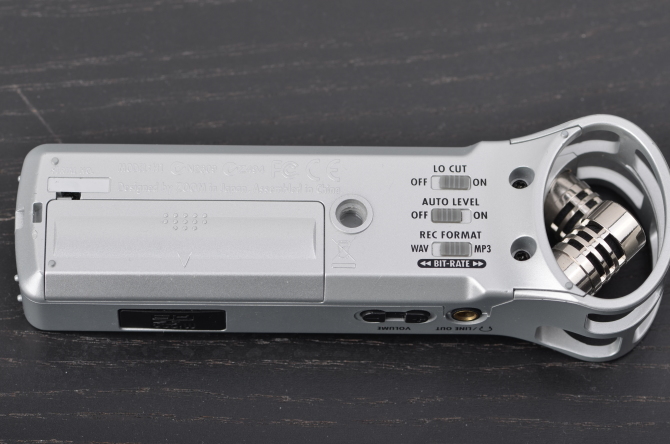
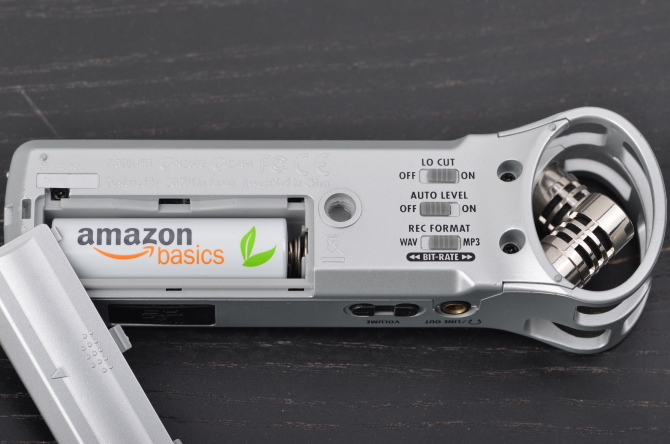
It has a number of settings in the back and also a battery compartment to put in a single AA battery. Part of the battery compartment is broken off (yours should not look like this), but it records just fine. H1’es are famous for having shoddy build quality and this one is no exception. Came pre-broken so I didn’t have to break it.

This thing eats through batteries so I recommend putting in a decent battery. For example the Amazon Basics-branded eneloop. I ended up ordering some eneloop pros (not pictured since not yet arrived) but most quality batteries should do just fine.

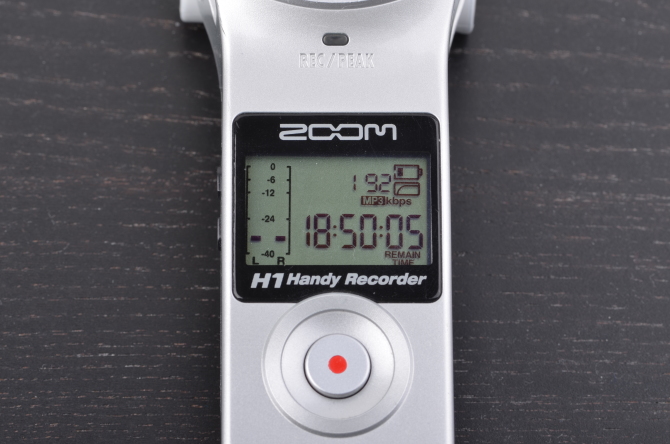
Turn it on and see some friendly greeting message (Zoom is a japanese corporation so the device says “hi” when starting and “goodbye” when you turn it off again) followed by the expected capacity for recording. This is nearly 19 hours of 192kbps MP3 on the 2GB card it shipped with, less with WAV. It can take up to 32 GB microSDHC cards which would probably last longer than my life expectancy.

This is also a great time to upgrade the firmware if you haven’t yet. You can see the version when it boots up, above the greeting. The most important update is version 2.0, since that adds USB microphone functionality. I quite like the fact that Zoom shipped such a useful feature to a device already on the market. The update to 2.1 adds… nothing but fixes issues connecting the USB 2.0 H1 to USB 3 ports on computers (the changelog says USB 3 support but let me assure you, the firmware can’t update the hardware).

Trying it out worked pretty well though unfortunately there is quite some breathing noise because I have lungs and occasionally exhale which is very much audible on the recording. The usual recommendation is to get a popping filter which also filters out popping noises of letters like “P”.

I went for something more stylish and slighly more universal: a dead cat. Or rather dead kitten. The fur of these dead critters, when put on the microphone filters out strong air movements like my titanic breath or the wind outside so in case I ever decide to leave my appartment I can use it outside. After searching the floor for dead or alive cats and only finding empty whisky bottles and sentient dust bunnies I turned to online shopping which netted me the Movo WS1. They sell the dead kittens ready to use:

Oh look, it’s the British foreign minister!

Shock mount assembly

Cool, the breathing noise is gone, I don’t have to hold my breath for 10 minutes when recording. But I’m always dissatisfied and now it’s the handling noise, because the microphones pick up all button presses and movements of the Zoom H1 so my recordings sound like I’m dragging that poor device through hell.

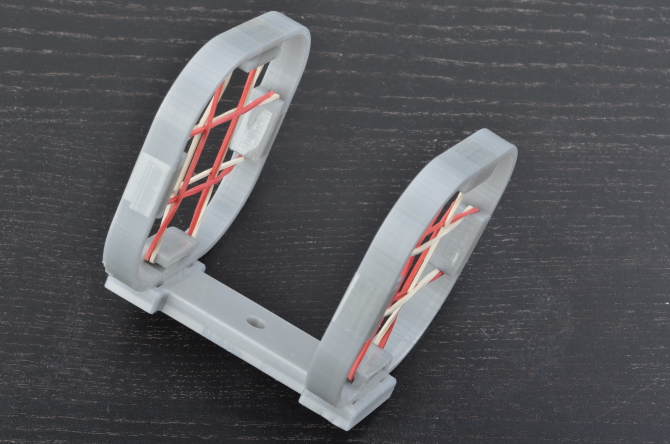
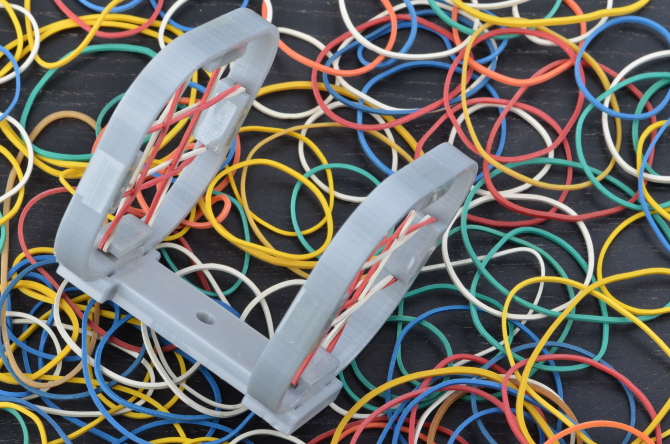
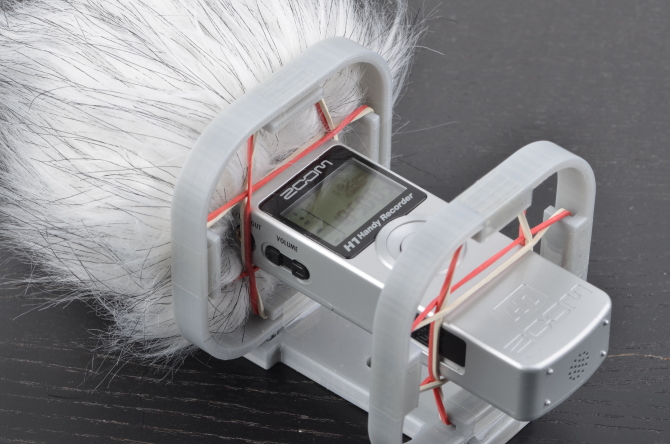
What I need is a shock mount! I could certainly buy one but why pay for something decent when you can 3D print something… less decent but cheap! Here’s a Zoom H1 shock mount 3D model. Put it in the 3D printer, print for 4 hours and add some 1€-store rubber bands:

I got a lot of rubber bands; let’s make this a cheerful piece of art that smells of latex (just like my hands):

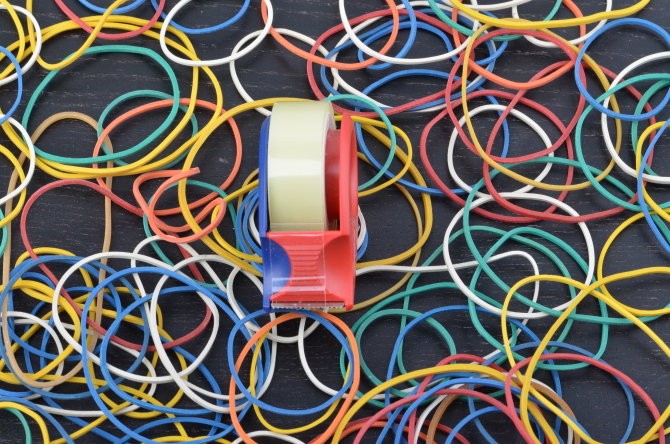
Also needed some scotch tape and since I’m in Germany it’s of course Tesa (pronounced Teh-Za); add that to our art installation:

Tape the rubber bands on so they don’t bugger off. Could’ve used gaffer tape for more nerd-cred but Tesa’s easier to handle.

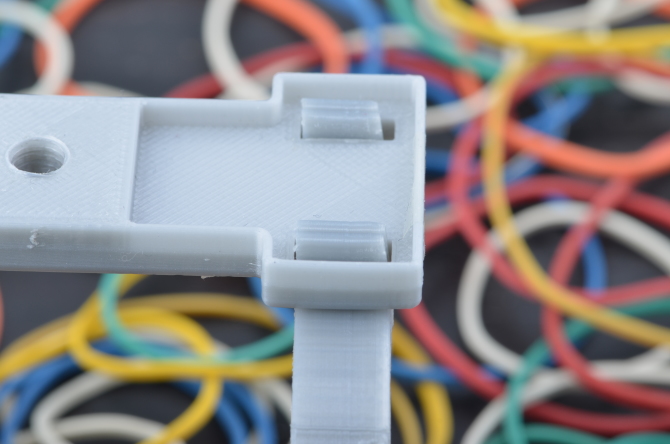
I printed it in three parts which had to be assembled somehow using the clip mechanism. Unfortunately it ended up being too imprecise for nice joining. After forcing the 3 parts together with nearly deadly force, they’ll probably never come apart again. Maybe not the best if you want to stash it for travel or something.

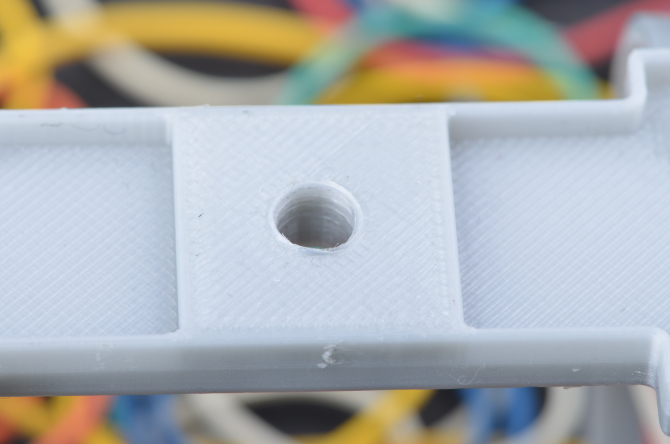
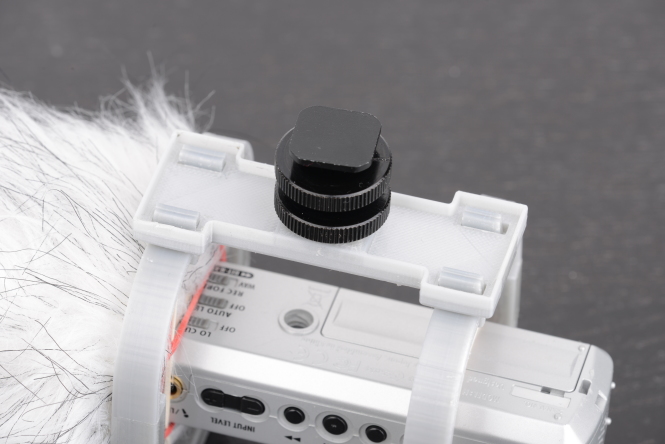
A nice detail of this shock mount is the fact that it has a hole for a ¼” screw, just like the Zoom H1 itself. It can be used to mount this mount (yo dawg) on a lot of things.

Unlike the Zoom H1 this hole has no threading but when you attempt to screw in a metal screw (don’t use plastic ones, and by the way, where did you even get plastic screws from?) it will create threads in the plastic. Neat. The pen may be stronger than the sword but still a metal screw beats PLA plastic.

Autobots assemble! What a great matching set of colours! The shock mount is ready but now it lays around sadly on the desk. Let’s put it on something.

Mounting on tripod

Since I am an great photographer (shut up, I am! cough) I have a tripod available so what better place to put it on than there. I started with the premise of a cheap stand, you say, and now I’m introducing an semi-expensive tripod? Oops. To my defense, recording stands can be inexpensively ordered and the contraption we build should attach to one just fine.

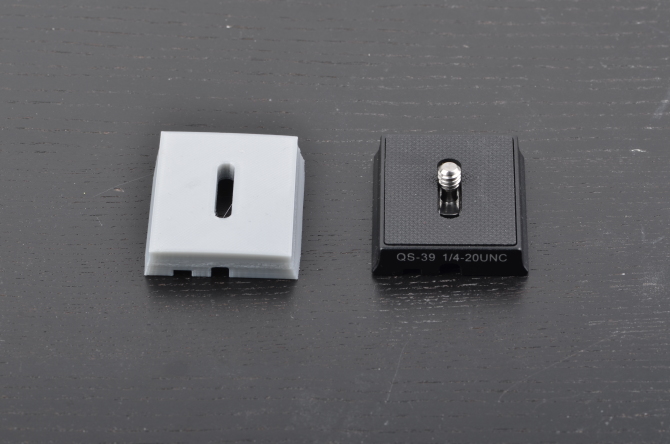
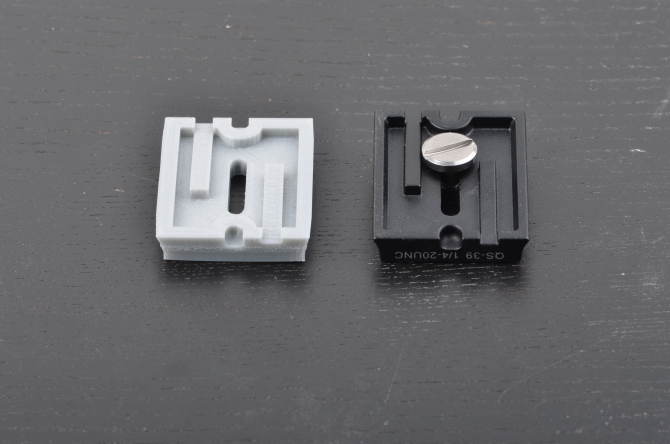
First I need a plate. Since I already use one for my camera I’d need a second one. Looked up on Amazon, 20-25€ for this small piece of metal? Gotta be kidding me! Back to the 3D printer, we have some more extruding to do.

It’s plastic but neither the Zoom H1 nor the shock mount are heavy therefore some 100% infill plastic thing will be sufficiently durable. The model linked works kinda alright for my tripod but it’s not great: one orientation is fine, in the other one it slips out of the release unless I fasten it. Still pretty good for a random find on the Internet that cost me zero minutes of my life time to design.

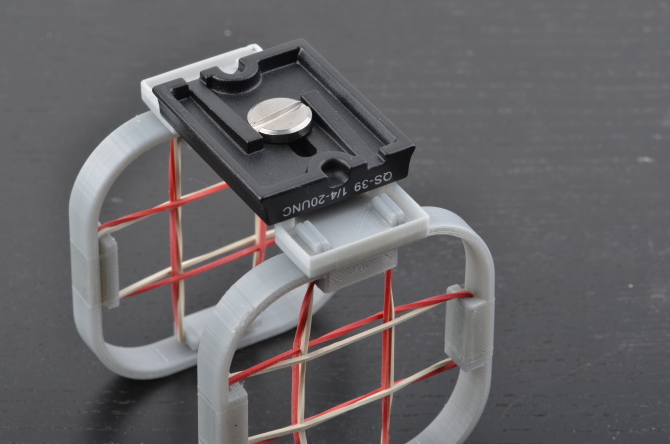
While I wait on the mounting screw to arrive from eBay I’ll continue with the legit tripod mount. Screw it into the mounting hole of the mount potentially cutting threads into the mount. First time is the most painful, as they say (albeit about a different screwing activity).

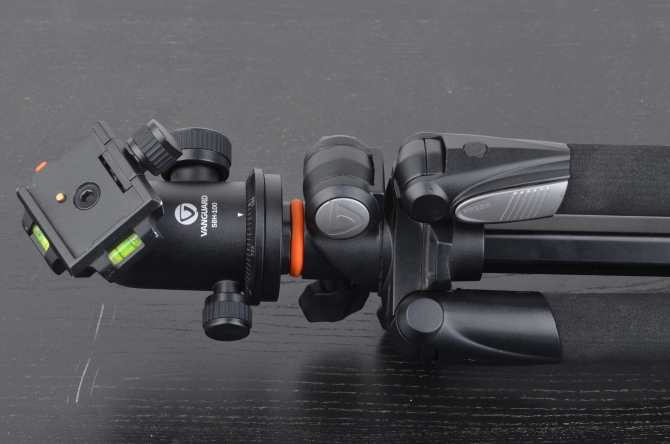
Grab your trusty tripod. I got this one. It’s not great but it’s mine.

For maximal professional look, you definitely need some headphones. Not only does it look super pro to have headphones on (even if you don’t plug them in anywhere), but if you plug them into the H1 you can listen to yourself being recorded. I love listening to myself mansplaining so that’s perfect.

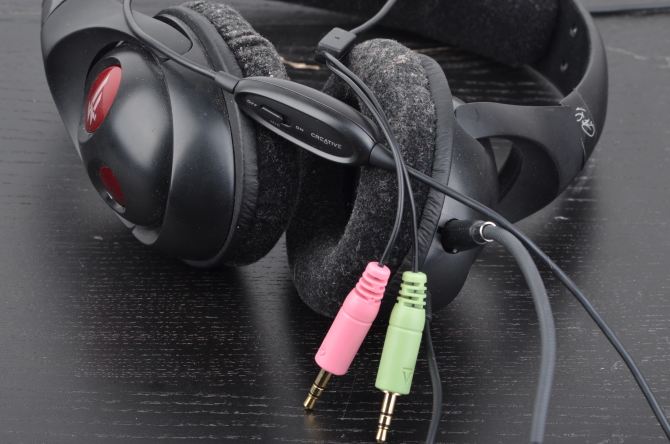
Therefore another piece of the kit: Creative Fatal1ty hyper-cool gaming headset I had laying around. Because I’m a pro-gamer. As you can see I use them all the time which explains the massive layer of dust. But any headphones will do, they only need a 3.5mm jack. This headset also comes with a microphone that I could plug into the H1 and record from the headset microphone. Though probably this mono microphone is worse than the XY-microphone array of the H1.

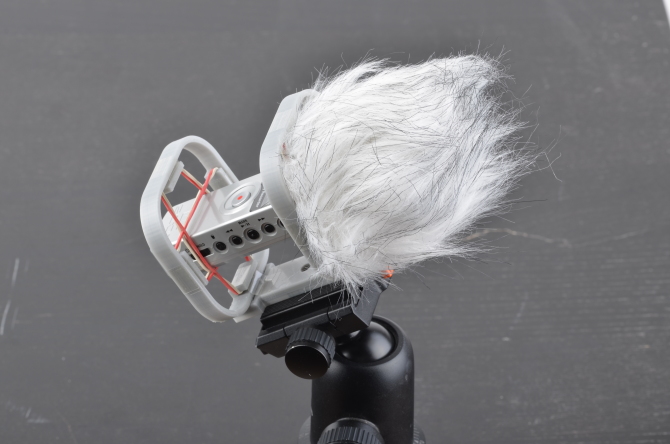
Put the shock mount on the tripod, set it to a reasonable height that works for you and you’re done. It kinda looks like a rocket launcher array. Don’t use it for launching rockets though, it most likely won’t work and you might hurt yourself.

I prefer to stand while recording but the tripod can also tilt so I could also sit down if my legs give way. It’s also possible to flip the tripod so recording from the floor could work as well. Or maybe from the bed if I don’t feel like getting up.

The whole thing all set up. The headphones are connected to line-out to work as monitor and can even be put on the H1 when not in use. Marvel at the Creative logo! You are a creative now!

Mounting on a camera

Bonus content time! Since the shock mount comes with a ¼” screw you can also mount it on things that are not tripods. Like drills but that would be really pointless. Maybe better on something like a camera for vlogging or filmographing. The bonus images are in ridonculous resolution, in case you feel like inspecting every speck of dust on my table. They all have IPv6.

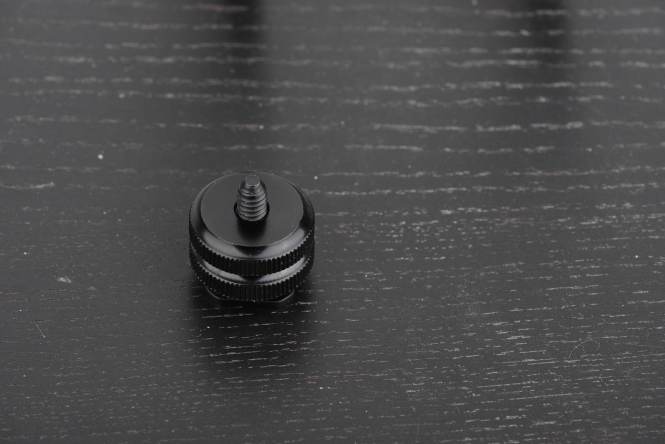
You need this little guy, a ¼” screw to hotshoe adapter. Easily attainable for peanuts from eBay by transporting it around the whole planet from China with free shipping.

Attach it to the same place where the tripod adapter was. You need to take off the adapter first though.

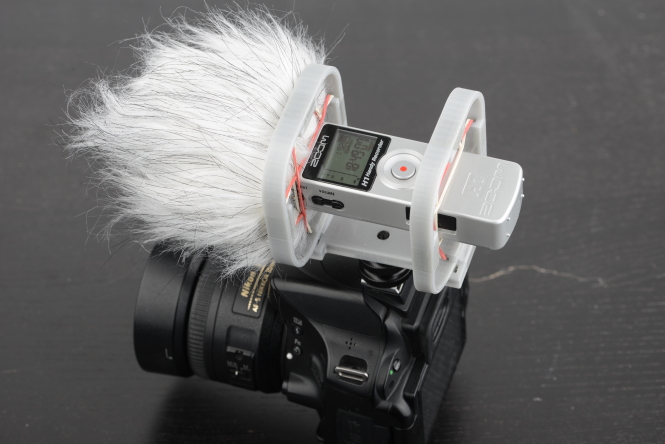
Attach the whole contraption to the hotshoe of your DSLR (or SLR or mirrorless), et voila! If you want, you can connect the Zoom’s line-out to your camera’s line-in (if available) to synchronize sound to your video. Or don’t. I’m not judging you.

Thanks to @learlyman for fixing up my english. All remaining errors are caused by my inability to follow simple directions.

Soylent Retrospective

Recently I finished my batch of four bags of Joylent (banana, strawberry, mango and chocolate). As it turns out, I haven’t died! Hooray! If anything I blog more often, which is probably not to blame on my nutricional choices.

Flavour experiences

Let’s start off with the fact that the taste has overall quite grown on me. Some people might dislike the strong taste of oatmeal but I enjoy it, it feels healthy. Before I have eaten cereal for breakfas every single day for roughly my entire school life (13 years, give or take), so I clearly don’t bore that easily.

The different flavours had some surprises:

  • I did not like strawberry. By far the worst. It had strawberry seeds in it (Wikipedia tells me these are called achene, The More You Know) which gave the impression of not being artificially flavoured. I wouldn’t know about that; maybe I just prefer artificial strawberry aroma.
  • Banana was to spite my expectations better than expected. It had a more muted banana taste which is far preferable to actual banana
  • Chocolate was chocolate. I liked this one, because it tasted like chocolate but wasn’t as sweet and overpowering as actual chocolate and you could eat more of it without feeling bad. Now give me a white chocolate flavour and we have a deal.
  • Mango. I don’t eat mango often, but this was by far the most interesting of the bunch. Had a nice fruity taste.

My Joylent order was a group order for three people, for completeness their impressions have been:

  • One tried banana, liked it better than expected
  • The other disappeared completely and haven’t heard from them since. Maybe in prison for walking around with bagloads of white powder. Or overdosed. Who knows.

Preparation

There were a number of reactions to my previous post on Soylent, saying that I should put it into a blender to dissolve it better. Unfortunately I don’t have one available, so while it might improve the taste, I’m not sure it’s worth for me at this point. Another idea was to put it in a fridge, which I did with the sole result that it separated into water and Joylent at the bottom. Also since it was chilled the taste was fainter. So that’s not really a solution for me either. On the other hand that’s fine because I can be lazy and make Soylent shakes just-in-time when I feel hungry and the exact amount I feel like.

Also realized that the less water I add the more I like it. I ended up most enjoying it in a viscous form comparable to lava. I can see how Uber Cookies make sense now, since eating Soylent in a solid form does sound appealing to me. Maybe next time I could try baking cookies myself (yes, I know this goes against my original plan to be lazy but I’d love to give this experiment a go some time).

Effects on the body

Usually I used less than the alotted ⅓ of a bag per meal, partly because I’m cheap, partly because I was eating normal lunch and partly because all this pulver in the shaker looked like a lot before adding water. That was alright, but I never felt particularly full afterwards, it was like a kind of snack, less like a meal. Since I don’t eat breakfast or dinner usually, that was alright with me, though at times I did want to eat a bit more.

My probably biggest fear for this experiment was that my digestive system would panic due to the liquid nature of the food, but no such thing happened. In fact nothing remarcable happened at all. I had no issues with teeth, since I wasn’t eating Soylent exclusively.

Next steps

So, after this great adventure (cough) what’s next in store? Frankly, I kinda miss the pulver, having this stuff available and ready to be made on a whim was nice. The taste was pretty good as well. Will I order more Joylent? Will I make my own Soylent according to some recipe?

Probably not yet. I will not order from Joylent any time soon, since my initial experience was rather mediocre (another cough). Maybe if they add some more interesting flavours. I will, though probably do another group order, this time from Queal, curiously another Soylent-producer from the Netherlands. They have some more flavours (though unfortunately, a good deal more expensive), so before I would attempt to make my own, I’d prefer to try out some different flavours and see what works for me and what doesn’t.

So, there might be some more episodes to go. Unless I die of food poisoning, that is :-)

The Little Camera That Could

Today I want to write a few words, not quite a review, on the Nikon D5100, the camera that could. Why? The camera is as of now 5 years old, which means it’s ancient by regular standards of electronics and obsoleted thrice by newer models in its own segment.

Why bother with this camera? People love their higher-end DSLRs with impressive specs. Hereby I want to point out that even entry-level DSLRs are impressively powerful, even if these are a few years old. Most of the things noted hence apply to its direct competitor as well, the Canon EOS 600, another entry/mid-level offering from a strong player in the DSLR market.

What I did with it

  • Portraits with natural light
  • Studio work with external flashes and lights: both modelling and product shots
  • Macro work
  • Concerts with Serious™ (pro-level) lenses
  • Travel photography (including deserts)
  • Sports (on a frozen lake into which I fell in, camera unharmed)
  • Shooting outside in rain
  • Long time exposures on a tripod (star trails!)
  • Smashing against all kinds of things

Number of times the camera gave up on me: 0.

Features

The D5100 packs in a punch. Along with the Auto mode, No-flash auto mode, a set of preset modes and a ton of useless “creative” modes it comes with the most important tools for photography: the Aperture-priority mode, the Speed-priority mode and of course the Manual mode. These three (along with the ISO setting) allow for a big degree of freedom to take pictures at a professional level.

But of course, every other DSLR also comes with those. These aside, the D5100 also has a set of other cool features that might not be obviously useful when you see them at first but might end up useful down the road. I have used just about every feature described below at least once thinking “oh, good thing it’s there”.

It has two infrared receivers (front and back), so it can be triggered via remote or even mobile phone which is useful if you don’t want to introduce vibration. Or want to take a shot from a different place from where your camera is. I use an Amazon brand remote which cost peanuts and works perfectly.

It has a tripod mounting hole so you can put it on a tripod or a strap (and you should, a proper strap makes it so much more convenient). Aside from the seconds exposures, you can also set it to a bulb mode so the exposure can be arbitrary long. It supports mirror-locking so you can avoid the vibration caused by the slap of the mirror when on a tripod. In addition has an intervalometer built-in, so you can create time lapses without having to buy an external trigger (cough Canon), just set the number of exposures and the time between those and off you go. A pretty amazing camera for working on a tripod.

The D5100 has a continous drive where it can take roughly 4 images per second so you don’t miss out on any fast action sequences. Or in fact, just leave it on all the time, so in case your first image is blurry you have a chance to get your second or third image sharp.

It comes with a tilty-flippy screen with live-view so you can see what the camera is seeing, even if you can’t look into the viewfinder (and it is very useful for nailing manual focus). So it can also be used to take selfies, though selfies with a DSLR are a bit silly (also, how are you going to post your selfie on social media now). But it’s nice if you want to film yourself: flip the screen over and you see whether everything is in the shot as you want it to be.

Another nifty feature is the support for a multitude of bracketing modes, most important the exposure bracketing. This allows the creation of good quality HDR images and was one of the reasons I chose this camera over the D3xxx series. I don’t do HDR very often, but it’s nice to have the possibility.

It can use both the “consumer” cheap Nikon lenses (mostly DX) as well as the expensive “pro” lenses (usually FX), so your lens selection is pretty massive, from the crappy kit lens and cheap travel-zooms, affordable primes to professional equipment built like a tank.

Being used to horrible battery lifes from laptops and smartphones I was very satisfied with the battery life of the camera. Usually it works out to at least 500 shots per charge (if you don’t use lenses with image stabilization), so for a long time I didn’t even bother with a second battery (which is ridiculously expensive especially for what little charge it holds).

Despite not being a “pro”-level camera so not being weathersealed and no fancy magnesium-carbon-monocoque-whatever body, it’s robust. I’ve shot in rain, I’ve bumped into things, I threw the camera around: nothing. Works just as new. After owning it for close to three years, I’m currently at roughly 25.000 shutter actuations which is one fourth of the actuations that this camera is rated for (by Nikon), but looking at statistical data there is a decent chance of exceeding that value by far.

Storage-wise I put in 16 GB and 32 GB SDHC cards as well as 64 GB SDXC cards which it handled flawlessly. These are good for roughly 1000 to 2000 pictures in RAW which is — I don’t want to say enough for everyone — decent for most people.

For a camera with 18 megapixels from 2011, the image quality is quite good. I prefer the combination of D5100 with some fast prime lenses to cameras like the 7D with slow zooms: there is far less noise. It comes with the same sensor as the D7000, so Nikon does not cheap out here at all.

It’s also surprisingly small. If that is a feature for you. Though its indirect successor the D5500 is even smaller, it still is surprisingly light for a DSLR.

What’s missing

Being a smaller DSLR it has no internal focus motor, so you can’t autofocus lenses which don’t have a built-in focus motor (but these are usually older lenses). It also does not have autofocus microadjustment facilities. If your lens focuses fine: good, if it back- or front- focuses, bad luck!

It also does not have an aperture preview button, but then you can just take the picture and see the resulting image directly.

Most importantly, it has fewer buttons than more expensive cameras, so you have to go to the quick-menu for some features that you can directly set with buttons on other cameras. These settings usually don’t need to be changed often, so having a short trip to the quick menu does not strike me terribly bad. A tad inconvenient yes (except for the Auto-ISO setting which is completely burried in the mess that the full menu is), but rather no game changer.

Conclusion

I believe Nikon has created a very, very capable camera and maybe even goofed up a little since they made a camera so good it is hard to recommend the more expensive cameras like the D7000-series. The biggest differences between those are of ergonomic values, not of image quality or pure performance.

Lamy From Their Home Market

I was eagerly awaiting Dr. Jonathon Deans post on the brand analysis of Lamy. Lamy for all my readers not from Germany or not crazy about fountain pens is one of the biggest and most well-known fountain pen brands and hails from Germany, along with its big competitor Pelikan.

Dr. Deans is an economist and despite me not caring about economy too much, I very much enjoy reading his posts which teach concepts of economy with fountain pens as an example. A very niche blog, but I learned quite a lot and his posts sound very logical and convincing, so I would recommend giving his blog a try even if you think “bah, boring”.

Pen Economics has some preferences of course, as we all do. He enjoys Montblanc pens and seems to dislike Lamy, like for example the otherwise very popular Lamy 2000, which amusingly I like for many of the reasons he does not. Each to his own.

So I was quite happy to see that the post on Lamy is something I largely agree on: yes, Lamy is really good in producing at scale and terrible at premium products. This is exemplified by the popularity of the Safari: you can buy it everywhere, be it your newspaper store around the corner, bookstores, airports. It was my first pen I got in second grade (and if you didn’t get a Safari you got a Lamy abc, that’s another sale for Lamy). I really liked the Safari back then and I also like my Lamy 2000. But their other premium pens? I am completely at a loss why these exist. They bring nothing new to the table besides some gimmicky design, coupled with the alright-for-a-cheap-pen Safari nibs and are sold for higher prices. I don’t think many retailers usually even bother stocking much of them.

Premium-wise Lamy is pretty much dead in the water. This is unlike Pelikan, who apart from their commodity segment also offer a number of premium pens that people want to buy.

But I disagree on the cheap segment. So far, Lamy does not have anything to fear from the Pilot Metropolitan (or it’s european variant, the MR) or TWSBI Eco in its home market, Germany. The Safari averages 15€ on Amazon, whereas the Eco is roughly 40€. Not even comparable. The Pilot MR is available for roughly 18€, but there is only the medium nib (at least it does take standard cartridges because Pilot cartridges are unobtainium in Germany), compared to the at least 4 nib widths of the Lamy. Also, I have not once seen it in store, so it certainly takes a far more dedicated buyer to search on Amazon for this particular pen and buy it without trying first.

A friend of mine is a big fan of Metropolitans, she ended up importing them with the fine nib from the US, along with converters from Japan. I think they ended up costing more money and effort than simple getting a Lamy from a store.

Now you could argue Germany is not a big market, but I would disagree. In primary school every student used to have a compulsory fountain pen to learn to write (not sure if that still is the case), so roughly everybody in Germany (80 million people) is at least familiar with the product. Two of the big fountain pen brands are from Germany. I would assume that the situation in Japan is similar with Pilot, Platinum and Sailor. Compare it to the US where fountain pens seem like a niche hobby with a lot of sales going through online retailers like Goulet Pens.

So is Lamy losing sales to the Eco? Definitely! Does it make a big impact on their bottom line? Unlikely, unless their competitors massively ramp up their offline retail presence. TWSBI does not seem to have the resources and Pilot, who has a decent retail presence with their other products, seems not to care to compete with Pelican or Lamy in the fountain pen segment. Their main competitor is… Online who offers cheap cartridge pens with a staggering variety of a models, going all in into the commodity market.

First Impressions of Soylent

I’ve been following the hype of Soylent some time ago and even thought about making Soylent myself from one of the reverse-engineered recipes that were posted on the Internet (if only for the fact that ordering from the US is prohibitively expensive) but recently stumbled over it again and decided to give it a try. I have no stake in the whole Soylent story, don’t proclaim it as future of nourishment nor the end of “proper” food as we know it. Just a lazy person trying something new and seeing how it goes. As with writing this post I’ve somehow now become part of the hype train, despite not even wanting to do so.

Considering I didn’t want to mess it up with mixing it myself for my first venture in liquid foods, I went for ready-made Soylent (only add water!) from the Netherlands-based Joylent which offered free shipping to Germany and thanks to the EU, no customs.

What followed were surprising questions from smart people around me. One of the most common questions was: Don’t you like eating? Which struck me as a pretty strange thing to ask, since I’ve just ordered food. I do like food, I go out for lunch every workday and often on weekends. After rent that’s probably where most of my money goes (and whisky, heh). What I don’t enjoy is cooking, especially for only myself. I need to buy ingredients which spoil comparitively quickly and are often offered in quantities far larger than I could use up as a single person. This continues to a point where I feel really bad about throwing away food, so I usually end up overstuffing and feeling horrible. I share my kitchen with my flatmate which makes cooking even less enjoyable. Therefore most days I don’t eat much but lunch. Healthy? Probably not, but my sense of hunger balanced pretty well with it.

I do not plan to eat exclusively Soylent, so issues like deteriorating teeth are probably not going to affect me. In fact I am even surprised people were interested at all to hear my experiences, since I wouldn’t have imagined eating Soylent could be controversial in the first place. But if it is a topic people would like to read about, I’m happy to oblige since I am curious myself. Apparently folks care more about nourishment than I would’ve imagined, a surprising lesson to me.

What I also cannot imagine is that eating Soylent would be any less healthy than eating frozen pizza every day. Some of those 3-in-1 pizzas taste pretty much like the cardboard they are wrapped in and consist seemingly mostly of fat and the cheapest meat you can make Salami of. Yet nobody worries about frozen pizza. Puzzling.

So yeah, after I ordered on the 2nd of May, my package only shipped on the 17th of May, which is far longer than the ETA 5-6 business days that are written on the Joylent web site, shipping then took only 2 days. I guess they are either facing quite a run or are terrible at scaling their production. It didn’t help that instead of the 2 shakers I ordered (since it was a group order) only one arrived. Maybe I’ll try Queal the next time; despite having a funny web site I am currently a bit underwhelmed by Joylent-the-company.

The packs are designed prettily and have an expiration date 6 months in the future which is surprising since it is basically sealed, dry food that should last longer. Since I don’t plan to store it that long, I don’t mind. I like that the bags are resealable, since I’m not likely to use one bag at once, as it is basically three meals.

I ordered each of the flavours (banana, chocolate, strawberry, mango) and after trying mango and banana, I much prefer the mango. But I don’t like bananas to start with so no idea why I even ordered it. The first two tries (breakfast and after work yesterday) didn’t go so well, because I didn’t use enough powder so it tasted mostly like watery oatmeal, which considering that the main ingredient is oatmeal, kinda makes sense. As I don’t usually eat breakfast, it was alright to not starve till lunch. Today’s try as a much richer breakfast-lunch (since I couldn’t be bothered to leave the bed at times people usually associate with the term “breakfast”) with mango tasted much better up to a point where I would even call it enjoyable. The only downside is that I still feel hungry, which might have to have something to do with the consistency of the meal.

Talking about consistency: I still think that it is a bit too liquid and gritty, despite shaking like a maniac. People on the Internet™ say that storing it in the fridge helps, but we’re approaching cooking again, whereas I’d prefer the convenience of fast-food.

21st of May 2016: after eating 3 meals of Joylent, I am still alive. Stay tuned.

Reason: Let’s See What Happens

Facebook published Reason a few days ago and after the initial surprise and thinking “hey, this will be good” I am a bit disappointed. I am aware that this is a preview and changes are to come, so this blog post is to give my initial impressions, coming from a person already using OCaml on and off since a few years.

OCaml syntax warts

When I heard that they changed the syntax I was quite happy, because the OCaml syntax can be quite whacko, I have a number of complaints:

  • begin/end are horrible delimiters and make code look ugly
  • I can never remember where to put the type params
  • Constructors can’t be used as functions (unlike its predecessor Caml Light)
  • ; in lists is weird
  • Nested pattern matching needs params unless it is the last branch of a match
  • let-in seems overly verbose
  • The precedence of :: can be surprising
  • , vs * in tuple types
  • (I also hate typing ;; in the Toplevel, but that seems fixable)

This might seem nitpicky, but when switching between OCaml and other languages, I do trip over these things every now and then. But with some thought it is possible to write beautiful programs in OCaml, as notty demonstrates.

Reason syntax

Now contrast Reason to OCaml:

  • Instead of annoying ;; you get an annoying ; in the Toplevel. 50% better, but not yet a complete win
  • Operator renaming. No idea why they got renamed. They all seem more verbose and I can’t imagine any JavaScript programmer saying “I’d love to see === in other languages”. No big deal in any case.
  • Local scope: Can’t remember when I needed this in languages other than Rust, though the addition of {} gives it an C-ish vibe which I don’t particularly enjoy. And the ; in the end seems like noise. Remember Pascal where there was end as well as end.? No? Nobody misses it.
  • Tuples have changed, but I don’t have strong feelings about them, but I kinda dislike using : for assignment in Records. OCaml uses : for type annotations, which is a habit other languages have picked up as well. In Reason it means a numer of things now, depending on the context
  • Tuple arguments in constructors was very annoying in OCaml, so that is better now
  • Why change match to switch? It’s a Rustism Swiftism and the necessary angle brackets make it look verbose. I agree that nested matches are inelegant in OCaml, but this can be fixed by wrapping in () which even makes sense logically, since () are just precedence operators and what we are doing is literally changing the precedence. Update: Rust uses match as well.
  • I don’t enjoy the extra ; in some OCaml examples making OCaml look more verbose than necessary. (Fixed quicky after mentioning on #ocaml, nice)
  • I just hate the ; in Reason. It doesn’t make any sense, unlike in OCaml where it can be seen as sequencing operator of roughly () -> 'a -> 'a type. The semicolon to terminate let …; makes this really weird, so ; is even worse than the already unwieldy let … in.

So overall it did some things I disliked for the better, some markedly worse with a dash of changes for changes sake. The question is whether it is possible to write elegant code in Reason and the introduction of {} in all kinds of places makes for a more noisy syntax. These changes, though there are some positive ones, don’t quite balance out the noise, so for me OCaml still reads nicer.

Missing things

Some things that are not yet addressed to Facebooks “new developer experience for rapidly building fast, safe systems”, yet are important:

  • Stdlib. Will every Reason program build its own extended standard library? Will everybody use Core in lack of good alternatives? OCaml is in a bit of a Catch-22 with libraries not wanting to include a heavyweight dependency like Core, which due to its size is unwieldy. For applications it doesn’t matter much.
  • Concurrency. We have Lwt and Async (on life-support) with a near-future OCaml bringing an effect system. Would be interested to hear what Reason’s plans in this regard are. I suppose it’s worth waiting for how OCaml will develop.
  • Documentation. A book for beginners (hopefully as good as RWO), some best practices, tutorials, a community to group around? So far I heard there is #reasonml on freenode, but I have doubts that this will be enough if Reason grows.

The good things

After this complaining what I didn’t like, I did enjoy some things:

  • Interop with OCaml. If it uses the same compiler backend and has the same type system, mixing with OCaml is possible. So Reason can use OCaml code without caveats as well as OCaml can interact with Reason code without issues. So it doesn’t matter what adoption Reason gets or does not get, the OCaml ecosystem wins.
  • Focus on good tooling. OPAM, Merlin and to a lesser degree utop made working with OCaml a lot better, it is great to see that Reason supports OTOP, Merlin and rtop out of the box. Having some editor integration that just works would be nice as well as a canonical build system which covers the 80% case well would be a great sell. Everything working out of the box without strange caveats could be a game-changer.
  • Huge audience. Facebook Jordan Walke have gotten a lot of well deserved developer goodwill by creating React and also some recognition in the OCaml world for creating Infer, Pfft, Flow. Putting the ideas of OCaml and even OCaml itself in front of a huge audience of developers could be potentially huge.

So overall: not a language for me (yet?), but I am cautionously optimistic that through some iterations we might arrive at something reasonable.

Some->>, a Monadic Map in Clojure

There is a number of threading operators in Clojure, I was talking about them recently. But there is one operator that is kinda interesting, since it accidentally has similar semantics to Haskell’s fmap/<$> on the Maybe monad and OCaml’s BatOption.map/Core_kernel.Option.map.

Ok, now as I scared everybody faint of heart away using the M-word, let me explain. Clojure of course does not have Option types, Functors or similar, instead everything is a value or nil (well, nil is also a value, so this is only an approximation). Looking at it from a slightly different perspective, everything is an Option type, since the Just/Some part is the value and the Nothing/None part is nil (I am aware this is not an entirely correct comparison).

Clojure also has a number of threading operators. Among these is also an operator that threads a value through a sequence of functions only if the value is not nil, namely some->> (and of course some->), otherwise it returns nil. This sounds like an nifty addition to the Clojure zoo of threading operators, but coincidentally is also very similar to how <$>/fmap/map behave. Especially considering that some of the code I write or work with every day often uses some->> without threading at all:

1
(some->> value-might-be-nil only-works-with-non-nil)

Which is semantically very similar to Haskell:

1
mightBeNothing <$> onlyWorksWithJust

Or in OCaml

1
2
open Core_kernel.Option.Monad_infix
might_be_none >>| only_works_with_some

So even if you use Clojure, you still benefit from cool functional programming concepts. They are maybe not that prominent but waiting to be used for great good!